
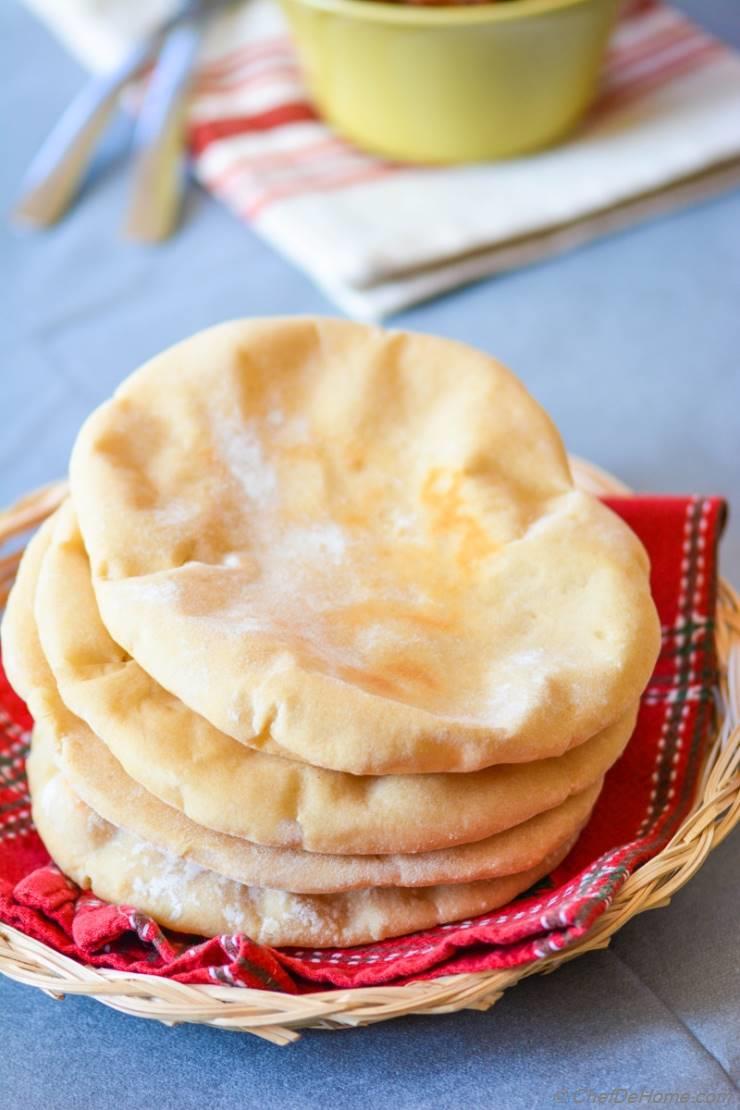
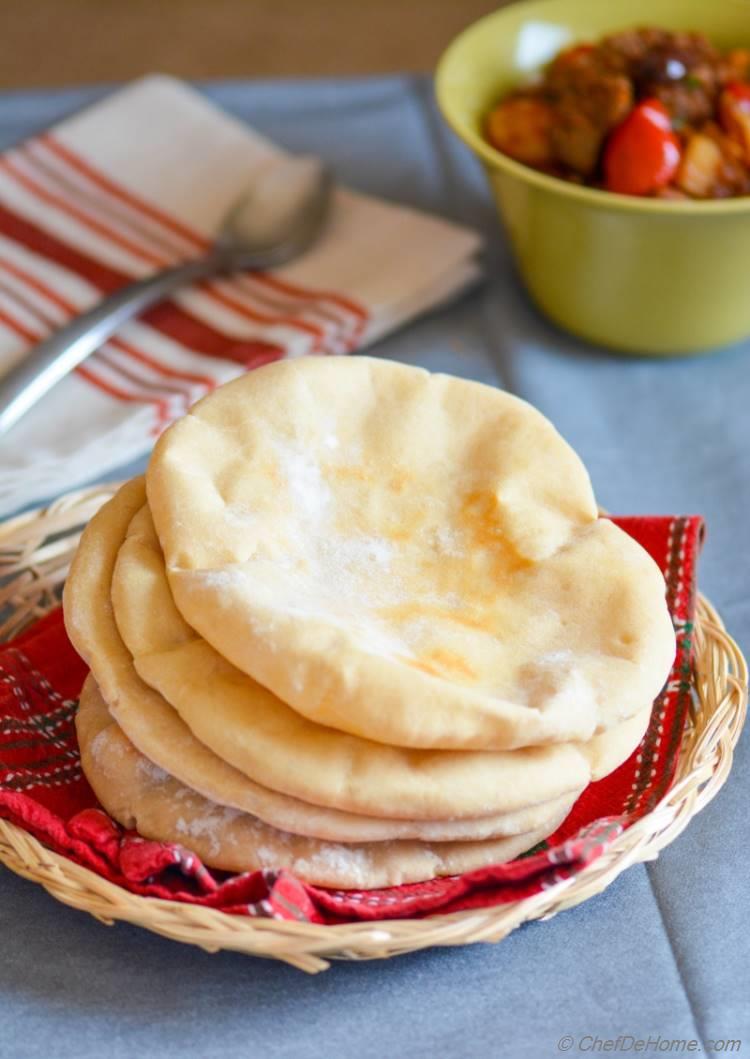
DIY Homemade Wholewheat Pita Bread
I baked these pitas to accompany Lamb and Potatoes Stew last week and promised to share the recipe with you all. Even though I promised to share this recipe sooner, last week, I could hardly find anytime to post.
Last week, there was a grand Indian Festival, festival of lights, known as Diwali. During this time of year, Indians clean their homes/shops, decorate, exchange gifts with relatives and friends, worship God, and cook various kinds of sweets/savory preparations to celebrate this auspicious occasion.
So... I got so busy with cleaning, cooking, and all that had no time to post Pita Bread recipe.
This week is relatively relaxing.... house is clean... so one less work for house lady :) First thing I planned for Monday was to share Pita Bread recipe.
Part Wheat Part All-Purpose
This bread, I have made with part wheat and part all-purpose flour. This mixed wholewheat flour-white flour bread has a little crispy texture compared to regular white. You can use only all-purpose if you want softer, store-bought-style bread. I had all intentions to make only all-purpose bread, but..... my health-conscious mind when gets stuck on a point, it doesn't let me deviate an inch. Food I cook, we eat for dinner, often. So, I not wanted an all white flour bread. Hence, mixed the two for some whole wheat fiber goodness.
Storage and Reheating Pita Bread
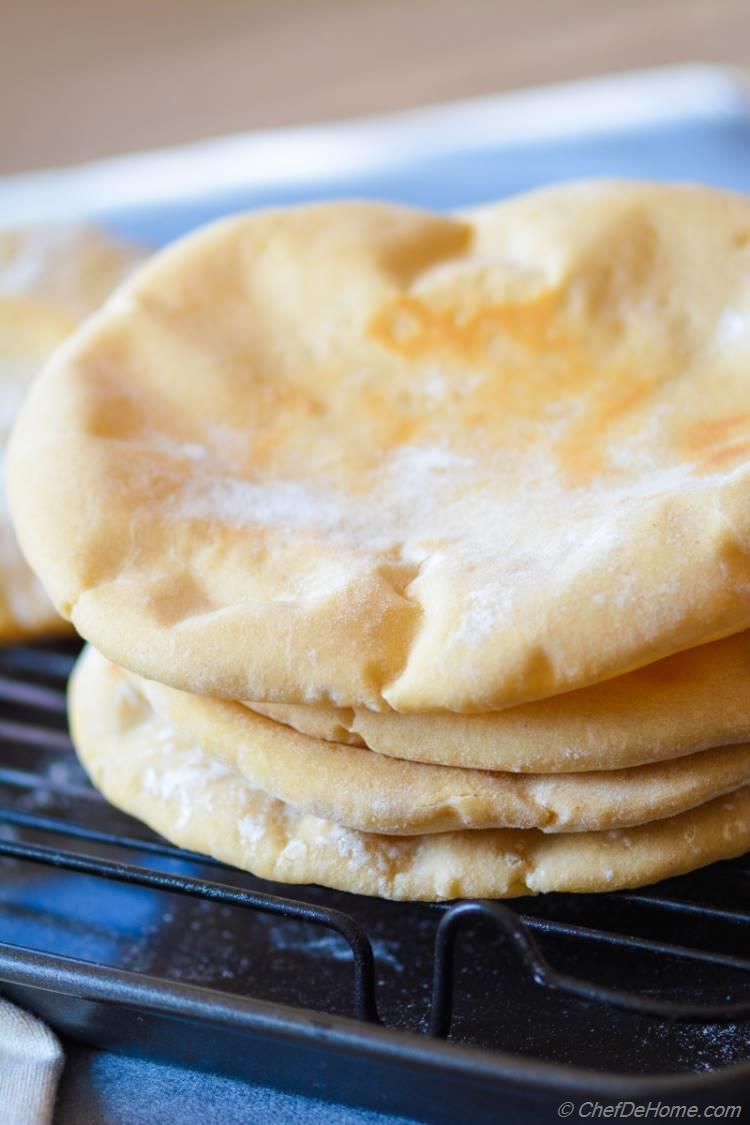
This pita bread is best consumed, fresh out-of-the-oven. If planning to eat later, wrap in aluminium foil for storage at room-temperature up-to 6 hrs. Before serving, wrap the bread in damp and clean kitchen towel, then microwave for 20 secs (once or twice) until heated through. Serve immediately. This process will freshen-up the bread, make it soft if it has hardened due to prolonged siting.
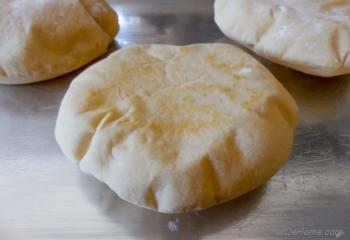
Does Pita Bread Puff every-time?
I hear many people saying homemade pita bread does not puff all-time. Well! I made a batch for clicking pictures and a batch for serving for dinner and my ALL pita breads puffed-up. So, answer is YES. Pita Bread can puff all-time. But, if it does not puff fully, don't worry... it still tastes great either ways.
However, you can follow few important steps to make sure all pita breads puff all time. Here are a few that I follow:
1. Always bake pita bread in preheated oven.
2. Never peek in oven (never open oven) for first 4 minutes of baking pita.
3. Use a preheated tray for baking pita breads.
4. Try roll pita bread little thicker than regular flat breads. Also, try to roll bread with even thickness.
That's it!! If you take care of these while baking pita, I am sure, your all pita bread will puff-up.
Can I make Pita Bread without Oven? on flat top?
Yes, you can!! It is very easy to bake pita breads on flat top or flat iron griddle. Make sure, griddle is hot (preheated) before you cook pita. Keep stove on medium heat. Roll bread and place on hot griddle. Let it cook for 1 minutes undisturbed, then turn the bread up-side down and cook the other side until little brown spots appear on surface. While cooking second side, use a little damp towel and press the bread on edges gently to help bread puff faster.
We often used to buy pre-cooked pita for pita pockets or Mediterranean dinner nights. After making pita bread at home... I don't think I want to buy from store any more. Plus since these breads can be made on flat top, I can easily bake a batch for our next Mediterranean dinner night.
Homemade, cooked pita bread does not last more than 6-8 hours whereas store-bought will not go bad for days!!! this proves, there are ingredients in store-breads, other than what we use at home and I bet those not good for health. I refuse to let these things enter my body (wherever possible!). So... I am adapting to home-cooked versions for my most favorite store breads, one bread at time. Join me in this revolution!
Be a proud home chef and Happy cooking!
Few hearty stews/curries to accompany Pita Bread:
DIY Homemade Wholewheat Pita Bread
Ingredients
Directions
-
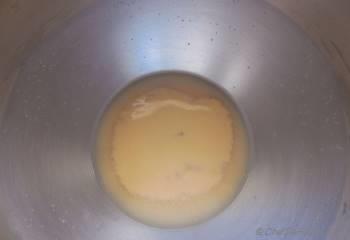 1.
Lukewarm 1/4 cup water, add sugar and yeast packet. Let it sit until foamy. (about 10 minutes.)
1.
Lukewarm 1/4 cup water, add sugar and yeast packet. Let it sit until foamy. (about 10 minutes.)
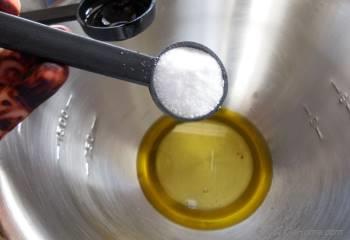 2.
In meantime, in a medium bowl, take olive oil, and salt.
2.
In meantime, in a medium bowl, take olive oil, and salt.
-
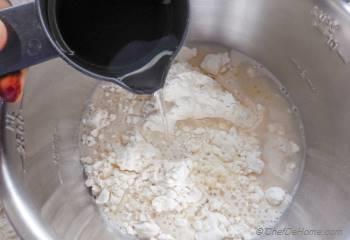 3.
Add 2.5 cup all purpose flour (1 cup all-purpose and 1.5 cup whole wheat) and remaining lukewarm water.
3.
Add 2.5 cup all purpose flour (1 cup all-purpose and 1.5 cup whole wheat) and remaining lukewarm water.
 4.
Mix water with dough using spatula/hands while adding 1/2 cup reaming all-purpose flour and yeast mixture, until dough comes together.
4.
Mix water with dough using spatula/hands while adding 1/2 cup reaming all-purpose flour and yeast mixture, until dough comes together.
-
 5.
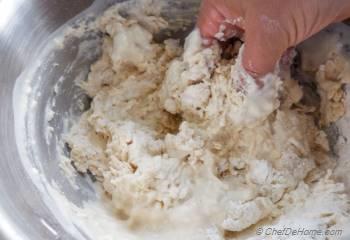
Knead with hands for 8-10 minutes, or knead at 6 speed for 5 minutes using dough machine, until dough is elastic and does not stick to sides of bowl.
5.
Knead with hands for 8-10 minutes, or knead at 6 speed for 5 minutes using dough machine, until dough is elastic and does not stick to sides of bowl.
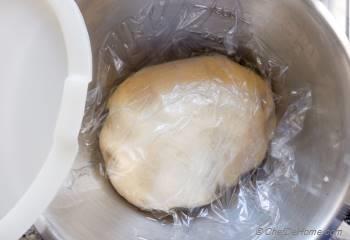 6.
Cover with plastic wrap and then leave to rise at warm place until more than double in size. (2-3 hrs)
6.
Cover with plastic wrap and then leave to rise at warm place until more than double in size. (2-3 hrs)
-
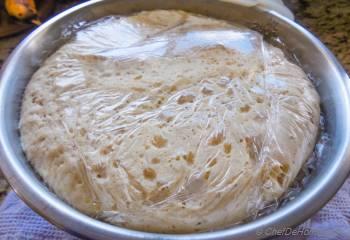 7.
This is how it looks after 2.5 hours. (It is still hot during day in my apartment. So, I left it to rise on kitchen counter.) Punch down the dough and leave it to rest for 5 minutes. In meantime, shift the oven tray in lowest rack of oven. Set oven to preheat at 450 degrees Fahrenheit.
Additional Notes:
If you live in a cold area, preheat oven at 200 degrees F. Switch off and then place dough to rise in switched-off oven.
7.
This is how it looks after 2.5 hours. (It is still hot during day in my apartment. So, I left it to rise on kitchen counter.) Punch down the dough and leave it to rest for 5 minutes. In meantime, shift the oven tray in lowest rack of oven. Set oven to preheat at 450 degrees Fahrenheit.
Additional Notes:
If you live in a cold area, preheat oven at 200 degrees F. Switch off and then place dough to rise in switched-off oven.
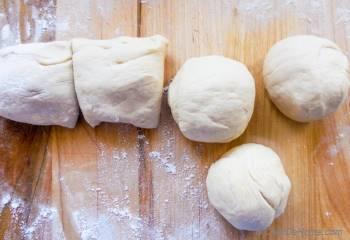 8.
Transfer the rested dough on a flour dusted board. Divide in half. (Cover one half while you work with one.) Divide one half into 6 parts and roll in palms of your hands to make 6 round balls.
8.
Transfer the rested dough on a flour dusted board. Divide in half. (Cover one half while you work with one.) Divide one half into 6 parts and roll in palms of your hands to make 6 round balls.
-
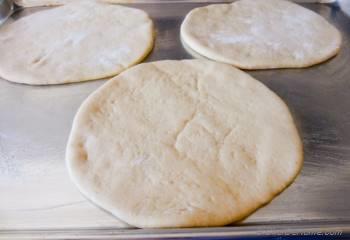
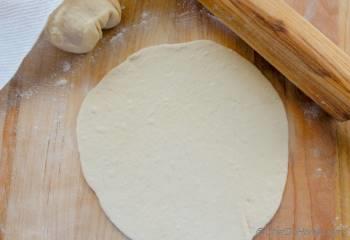 9.
Preheat a sheet tray (or 2 trays if your oven can hold two) for 15 minutes in heating oven. While tray is heating, keep dough balls and remaining dough covered with kitchen towel. Takeout dough balls one at time and roll to 5-6 inch round circle and keep placing on a separate towel/board dusted with flour. Roll first 6 dough balls and leave covered on board for 15 minutes.
Additional Notes:
Try to roll flat circle little thicker for softer bread.
9.
Preheat a sheet tray (or 2 trays if your oven can hold two) for 15 minutes in heating oven. While tray is heating, keep dough balls and remaining dough covered with kitchen towel. Takeout dough balls one at time and roll to 5-6 inch round circle and keep placing on a separate towel/board dusted with flour. Roll first 6 dough balls and leave covered on board for 15 minutes.
Additional Notes:
Try to roll flat circle little thicker for softer bread.
 10.
Take out heated sheet(s) from oven. Brush oil. or spray oil on heated baking sheet. Place 2-3 rolled breads on heated each sheet and transfer to oven (lowest rack) Bake in for 7 minutes.
Additional Notes:
Don't open oven door for first 3-4 minutes. Bread will mostly puff up during this time.
10.
Take out heated sheet(s) from oven. Brush oil. or spray oil on heated baking sheet. Place 2-3 rolled breads on heated each sheet and transfer to oven (lowest rack) Bake in for 7 minutes.
Additional Notes:
Don't open oven door for first 3-4 minutes. Bread will mostly puff up during this time.
-
 11.
While first batch is cooking, roll out rest of dough balls and leave to covered for 15 minutes. Once first batch is cooked, take out the sheet from oven.
11.
While first batch is cooking, roll out rest of dough balls and leave to covered for 15 minutes. Once first batch is cooked, take out the sheet from oven.
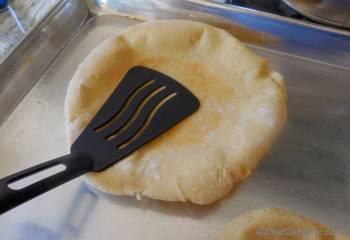 12.
Flatten the bread with slight pressure of a wide spatula and transfer on dry kitchen towel.. Transfer new rolled dough on sheet and bake again (repeating steps 9-12 until all dough batches has been cooked)
12.
Flatten the bread with slight pressure of a wide spatula and transfer on dry kitchen towel.. Transfer new rolled dough on sheet and bake again (repeating steps 9-12 until all dough batches has been cooked)
-
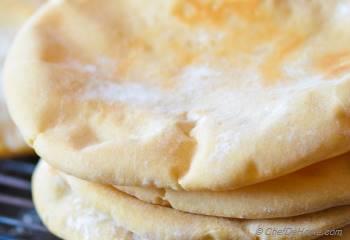 13.
Serve breads warm with stew of your choice. Or make pita pockets for lunch. Enjoy!
13.
Serve breads warm with stew of your choice. Or make pita pockets for lunch. Enjoy!
Savita's Notes:
Roll pita bread little thicker than regular flat breads for softer texture.
© Chef De Home. Post content including video and photos are copyright protected.
We Think You'll Love


Blogger behind Chef De Home. (...about me)


Leave a Message:
Did you try the recipe? Do you have feedback or a question? Leave a message below.
8 Responses
Brenda
I sure wish we could print out your recipes...this wont print nor your naan one!Savita
Brenda, I regret the inconvenience you have been going through. Please use Chrome browser to print and recipe prints fine. On Internet explorer or edge browsers it is giving trouble which we will fix soon. thanks for your patience.Savita
thank you so much for beautiful words for my blog, @Mira! I am glad you like this Pita Recipe. I never feel recipe complete without step photos, so try to include wherever possible. thanks again for stopping by! Happy to see you around :)Mira
Hi Savita! You have a beautiful blog! I love the step by step pictures! Saving this recipe, because I really wanted to make homemade pita bread, but never found the right recipe.Savita
@Memoria, thanks a ton! I am glad you like my pita bread pictures and recipe.Memoria
I have some hummus I bought at the farmer´s market that would go perfectly with these pitas! I must try out this recipe. Your pitas look so soft and fluffy and much better than the hard ones I bought at the store. Thanks for sharing your lovely photos, technique, advice, and recipe!Savita
I am sure you will love homemade pita @Brinana. Happy baking!Brinana
So wanted to make Pita bread since long. I have to try this one!