
Writing a food blog or blog in general requires many skills. It is not just about cooking good food. One has to wear different hats at different times to maintain a successful blog. Thinking for creative recipes, cooking, taking good pictures, socializing, marketing, writing about food are a few of important areas that a food blogger needs to work-on and work efficiently.
My IT background certainly helps me at times but I started as an amateur food blogger and it took me time to invest and understand tools and techniques required to manage a good food blog. One of THE important skill that you need for impressive blog is - Photoshop Editing.
For a long time I used free software PAINT.net to edit and caption my photos. Recently, I (finally) decided to invested in Adobe Photoshop subscription to get better control over photos I am shooting.
Trust me, if you are planning to impress masses with your Food Photos, Photoshop is your BEST FRIEND!
This series of post I will be dedicating to new things I am learning and implementing in my Food Photography using Adobe Lightroom and other tools.
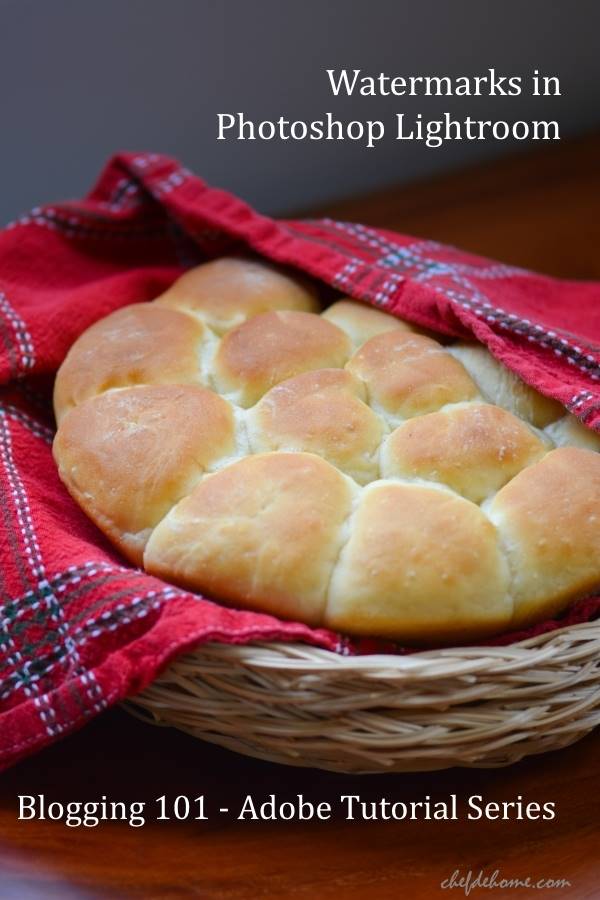
Today, let's look at how to overlay caption/text over the photos like I have added for my Fluffy Buttermilk Dinner Rolls.
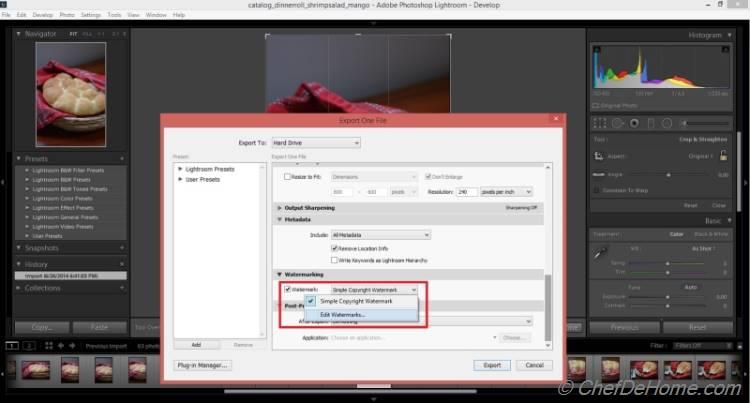
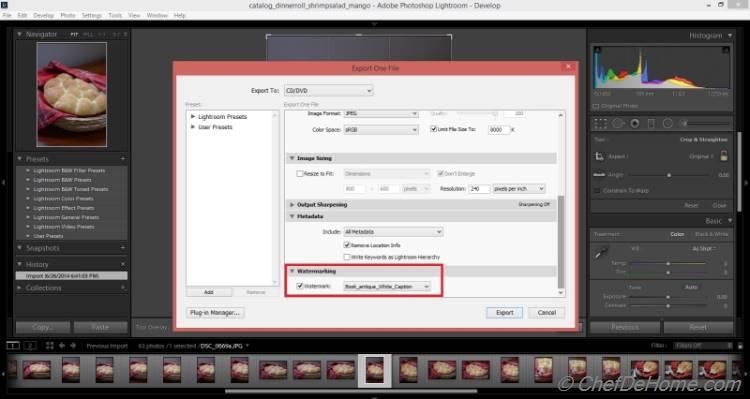
Adobe Lightroom (Lr) is an impressive and vast tool, really fun to understand and explore. Adding caption to photos is very easy and straightforward yet a little tricky to reach to at first place. If you ever used Adobe Lightroom, I am sure, you have used File -> Export.. option. This is how web ready jpeg images are exported to disk from Lr. There are so many options in File -> Export.. that I can write 2-3 complete posts just describing those. However, for today's post, we will just look at Watermark Option.
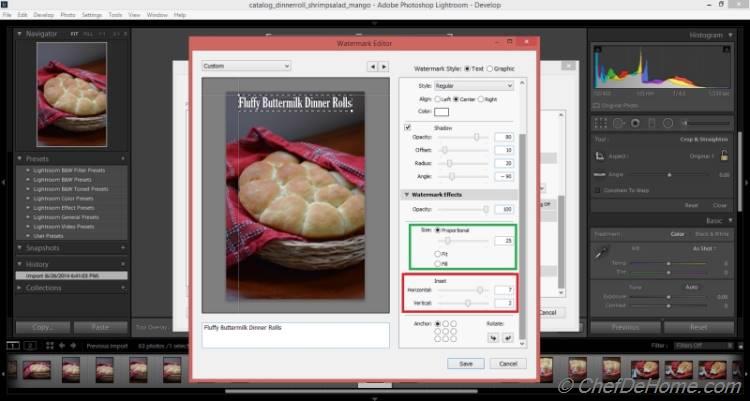
1. First of all select a picture in lightroom to which you want to add caption. Then, open File -> Export... and scroll down to the end of dialog, second last options is Watermarking. To add a caption to selected picture, all you need is this! So, let's check the checkbox and select Edit Watermark option from dropdown just next to check box.
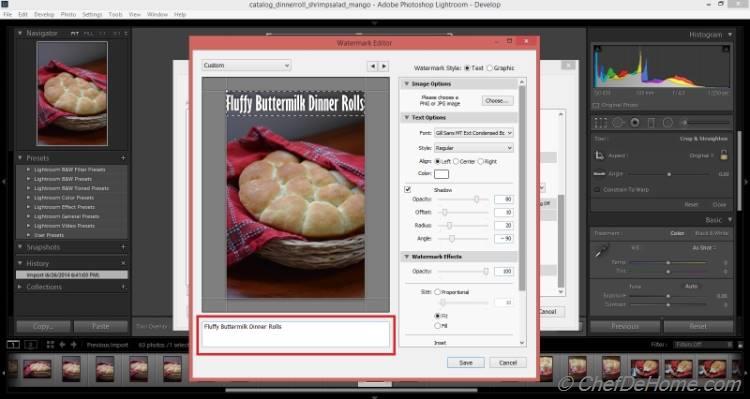
2. Edit Watermark will open another dialog - Watermark Editor on top of File -> Export... dialog. In the textbox, just below the picture displayed, type in a text like I have typed "Fluffy Buttermilk Dinner Rolls" for my selected picture. Once you have added the text, there are a couple of options on the right side to control text size, position, color, effects etc. Let's explore these options to make caption/watermark look better and appealing.
3. First of all let's position the text at desired corner of picture. The last option on the right panel, Anchor has number of pre-defined position where you can place the text. Like I choose bottom-right corner for text in the screen-shot. Select different options to play around with the positioning.
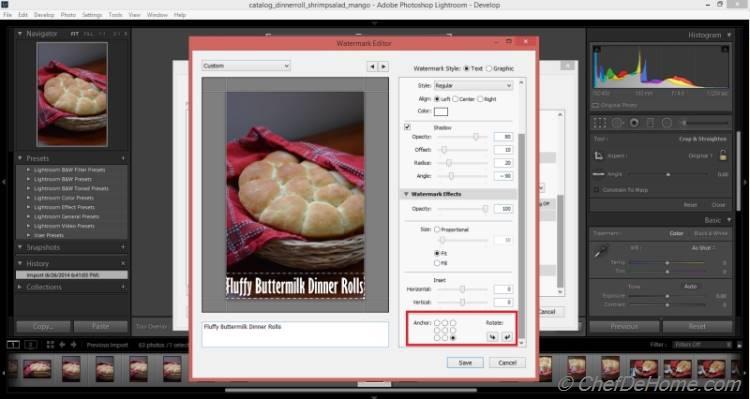
4. Yet important option in right panel - Inset. This will help you define the indentation of the text on picture. Drag the vertical or horizontal slider to move the text from vertical/horizontal edges of the picture.
Just above the Inset (highlighted green) is text size. With radio button selected as Proportional, drag the slider or you can specify exact size on the text-box on the right to define the size of text. You can also check Fit option which will adjust the font size to fit the text on picture or Fill which will fill the text on picture width-wise and height-wise.
5. Other than adding a text caption/watermark on picture, you can also choose to add a Graphic on the picture. Select the option and then select a logo/picture from your hard drive. Like I have added chefdehome logo on the bottom right corner. You can use Opacity filter to mingle it with rest of the picture.
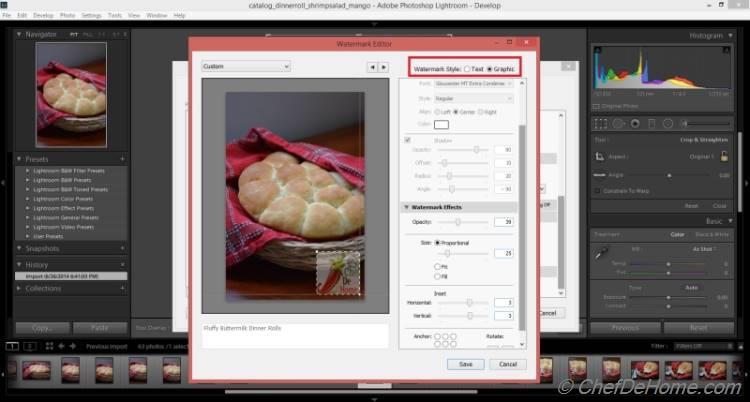
6. Once done editing, click the Save button at the bottom of dialog. Give a name to caption/watermark edited. Every picture exported with this watermark selected will have caption in the exported jpeg file.
For Captions, you will want to make different captions and export different pictures with different text overlays. Or you can use same Watermark for all images like for Logo Watermark.
I hope you enjoyed reading this article and it will help you jazz your Food Photos with beautiful captions/watermarks.
PS: I still use Paint.net wherever I'm new to Light-room! It is a great free tool to start working on your blog pictures without investing a dime! By far, the best free tool ever!
If you want to read, here are some of my other experiences in food photography!
Until next tutorial, happy adobing!!


Leave a Message:
16 Responses
Cherie @ FoodRecipesEasy
Thank U for an interesting post on watermarks. Can you share the best fonts used for watermark?Savita
Hi Cherie, I'm glad you like the post. I use a set of fonts which come with Adobe package. Let me know, if need more details. Happy watermarking! :)Anu-My Ginger Garlic Kitchen
Very useful tutorial Savita. Loved this post. I and are on the same boat, that site stole my recipes too! :(Savita
Anu, that is not good! there is a thief on the loose! Stealing everyone's stuff!! send me a message which site is it! I would like to check mine too!Kimberly
Useful Tutorial. Now Maybe I can make my pictures look prettier too :)Savita
Kimberly, thanks! :)Ritu ahuja
Very useful and interesting post. I am looking forward to more. Share some for food presentation too. I am big fan of your way of presenting food. :)Savita
:) thanks, Ritu. Well, presentation is part learning and part imagination. Yet it is interesting how I get there! Good idea, I will share if I can get a post together. promise!Momma Baker
I needed this post! I just started editing and using a dslr recently! Very informative!Savita
DSLR is certainly a good investment in a blog! Let me know if you need any inputs, @Momma Baker!sathya@mykitchenodyssey
Def bloggers have to wear many hats and has to do so many things.This is such a useful post for bloggers like me who get stuck in editing.Savita
thanks, Sathya! I'm glad you find this post useful :)Manali
But what's the point of these watermarks?someone stole my pictures, came to know today and placed their watermark on my pictures! There are no ethics or values left in this world! Sad.Savita
Seriously, It's a shame, we do so much effort to put things together. :( You know, don't take it lightly, ask once to remove images or if that fellow is on google network, anywhere, complain to google. They are surprisingly responsive for these issues. Not just they will get your work-duplicate-copy removed but will also downgrade the rating of that website.Manali
Useful tutorial Savita. I use lightroom to edit my pictures too. But I have never used the watermark picture because sarvesh has done some coding in a way that watermark comes automatically on my pictures when I upload them on blog! :DSavita
gr8! I think all developers think alike :) I too have coded auto watermark for my uploaded images. But I like to still caption and watermark a few images manually based on situation. For those, I don't go for auto-watermark and use light room or paint.net. Thanks! I'm glad you like this article.