
Homemade Paneer
Learn to make Paneer (Indian farmer's cheese) at home. 3 ingredients and 30 minutes, and get homemade Paneer for all of your's Indian Curry cravings.

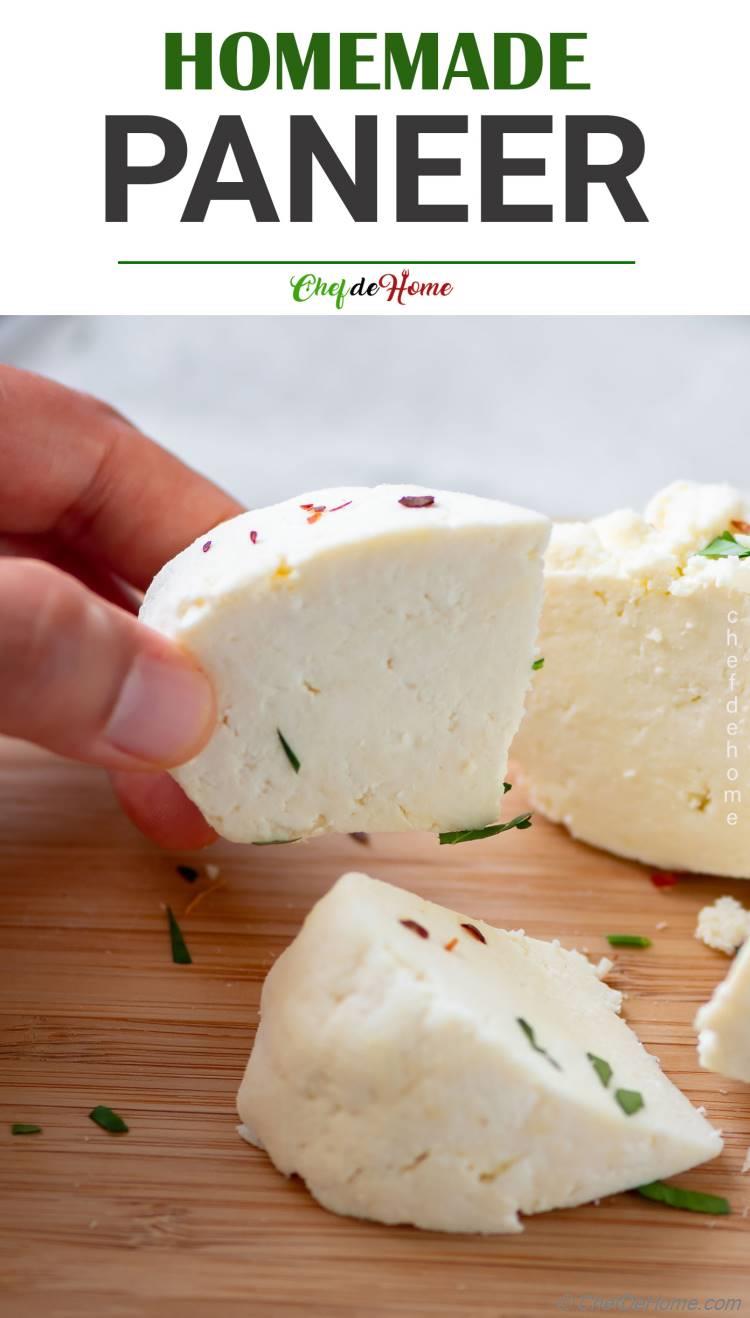
Sharing an easy recipe to make Paneer. Today's post has everything you need to know to make perfectly firm Paneer better than store-bought. It tastes clean, has fresh melt-in-mouth texture. Above all, it is gluten free and need just three ingredients. Paneer is unripened cheese. You can make it fresh and it will be ready to eat in just 4 hours.
During these days of staying at home, I did not get chance to visit Indian store for months. I've been trying to be resourceful and making a lot of things at home. This also helps me manage the stress and all while preparing a delicious meal for my family. Last few months, I made Paneer so many times for Indian curries. I was only thinking about sharing the recipe on the blog.. when one of the CDH follower also requested the recipe. I moved Paneer recipe up my to-post chart and here we go!
Sometimes I get disappointed when I buy Paneer from Indian store and Paneer is tough or rubbery. Many brands of Paneer sold in stores have so many added thickeners where Paneer only needs milk and coagulating agent (lemon, or vinegar). Unnecessary thickening agents such as flours, starch or gums are what make store-bought Paneer rubbery.
Honestly, once you make and try Paneer at home, you will never buy it from store again. Trust me, it is a clean, simple and tasty treat to make at home. So, let's make Paneer today!
WHAT IS PANEER?
Paneer is an unripened fresh farmer's cheese. It is easy to make at home with just 3 ingredients. Also know as panir, this cheese is heavily used in Indian snacks, curries and sweets. Paneer holds it's shape and does not melt like aged cheeses. This makes Paneer a good contender to make fried snacks, or curries. It is also a good clean source of protein.
Paneer is made by separating curds from the whey. Whey is the liquid remaining after milk has been curdled and strained. Unlike Italian cheeses, making Paneer does not need enzymes but simple vinegar or lemon juice, or a combination of both, to separate curd from milk.
PANEER INGREDIENTS:
Like I mentioned, all you needs is Whole Milk and natural coagulating agent - Lemon Juice, White Vinegar. If you have these at home? You can make Paneer at home, today, in just 30 minutes. Starting from milk to a block of paneer. (exactly like shown in pictures)
Do you need both, lemon and vinegar to make Paneer?
I use both lemon and vinegar to make paneer. Lemon juice helps make soft curds which yield buttery Paneer. Vinegar helps in quick coagulation. You can still make paneer with just lemon juice or just vinegar. But please note, add extra lemon juice if milk don't coagulate with 2 tbsps of Juice. You might also need to heat milk longer until whey fully separates from curds.
Like other cheeses, Paneer cheese curds get better as it age. It does not need years but few hours to be ready to eat. Freshly made Paneer will be soft and crumbly, more like Queso Fresco or Goat Cheese. Soft paneer is great for desserts. A 4+ hour to a day old Paneer will be firm enough to slice and hold it's shape in cooking.
Note: The good ingredients are essential for any recipe. Likewise quality of milk is very important to make good quality Paneer. For best results, please only use Whole Milk. My favorite is Maple Valley Organic Whole Milk. Love the quality of Paneer I get from this brand of milk.
EQUIPMENT TO MAKE PANEER:
Now, if I go into traditional cheese business, I would say, buy a cheese cloth. If I ask my Mom or even in my home, Paneer comes together without it. For the amount of Paneer we use in Indian kitchen.. I don't have time and money to keep buying bundle of cheese cloths.
So here is what I use:
- A clean old cotton kitchen towel (like you see in pictures) or a white cotton craft cloth which I can wash and reuse. (You can use Cheese Cloth but I find it difficult to wash and reuse.)
TIP: After cheese block is set, I wash cotton cloth under warm running water to remove any cheese solids. Next, toss it for regular wash in washer. - Or I use 3 Layers of Bounty Paper towel. (cheap but my favorite) Works perfectly every time. Use and throw. No cleaning needed.
I'm sure you saying, look she is suggesting to buy paper towel in such times when Paper towel is hot commodity. Right now, it will be cheaper to buy Cheese cloth than Paper Towel.
(Oh, BTW, I'm not advertising for Bounty. It is just that I found it most sturdy. It handles and strain Paneer from the whey very well.) - A Soup Strainer or Colander to strain whey from the curd.
- A heavy weight to press the cheese to expel most whey out. e.g. A bag of beans, mortar of mortar-pestle or a heavy cast-iron pan.
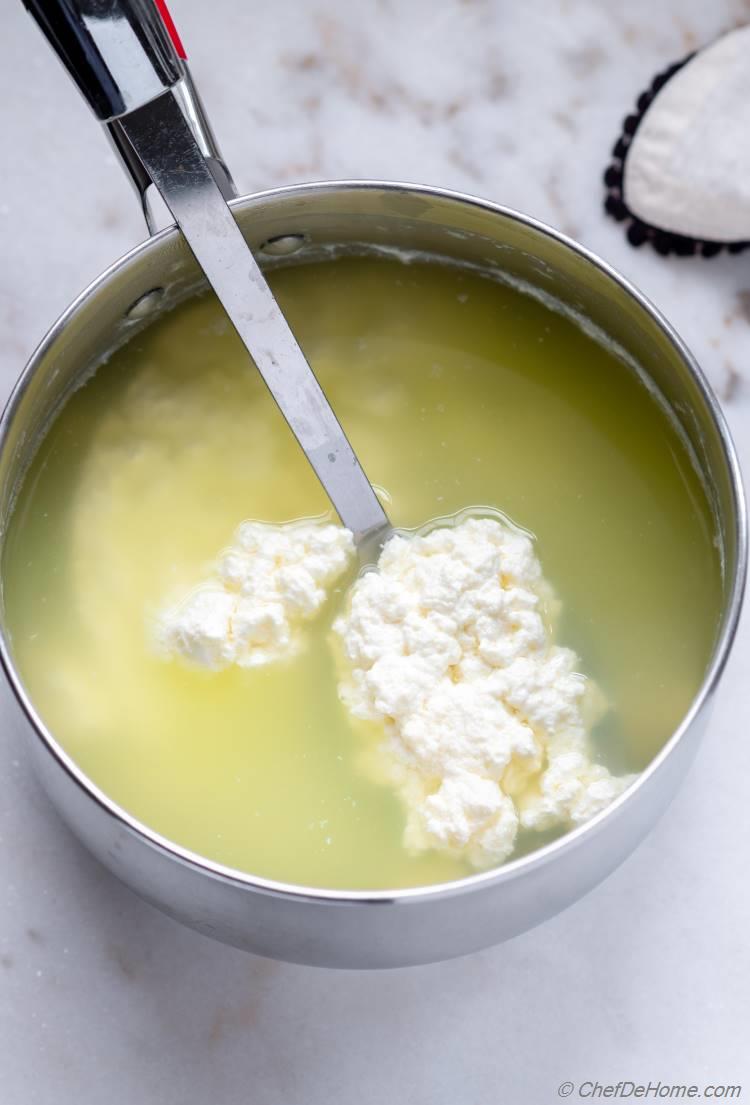
To make Paneer, I start by heating the milk on medium heat. Keep heating until milk starts to bubble at the edges but not yet boiling. Boiling separated fat from milk which is not good when making cheese. While milk heats, in a small bowl, mix water, lemon juice and vinegar. Add to milk and mix. Let it simmer until whey separates from curd and is very clear like you you see in step pictures above.
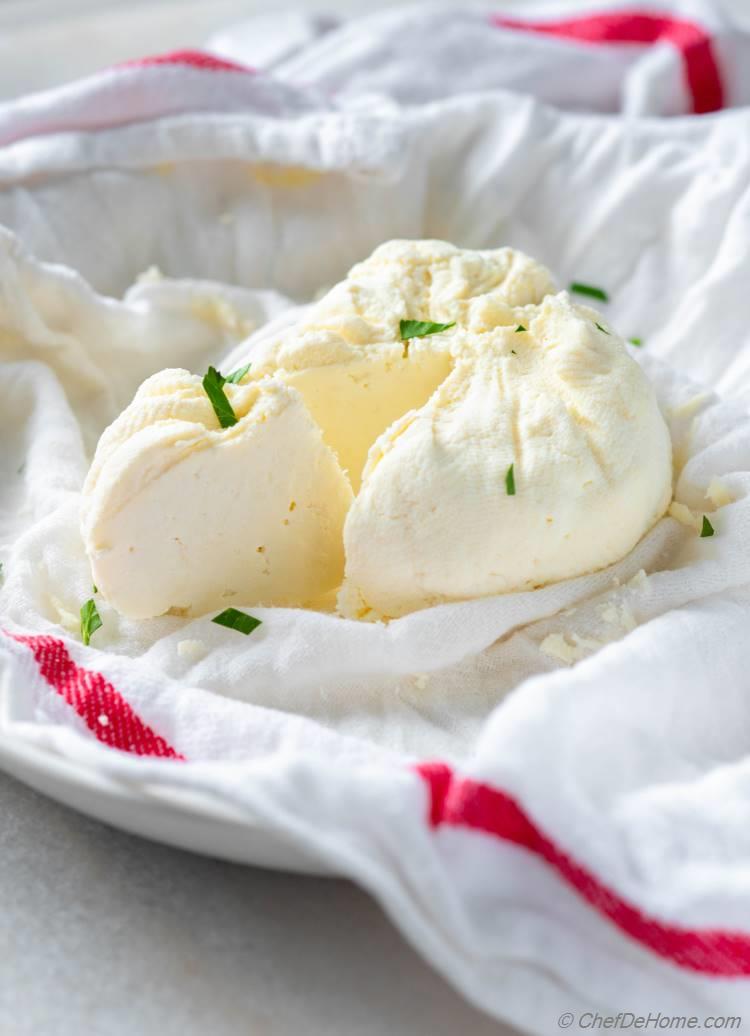
Once whey and curd separate, let is stand for 5 minutes. Next drain the whey by passing it through a sieve lined with cotton cloth. when easy to handle (not hot), squeeze water out of curds and tie a tight knot of the cloth to make a parcel. Leave as-is or put weight on top for 4 hours. Open the cloth and Paneer cheese will firm-up and look like a small mini cheese log.
Note: Don't rush to strain the coagulated milk. Let it come together. As you can see in the picture above, whey is completely separated from curds and curds have come together like little clouds. There is not sign of white milk.
Fact of the day: Did you know, 1.25 litre whole milk yields about 200 grams of Paneer?
HOW TO KEEP PANEER FRESH LONGER?
If you looking to make Paneer at home to try Indian Curries. Try make it a day ahead. It will last 3-4 days in refrigerator when stored in a dry air-tight container.
You can also increase shelf-life of Paneer by 6-7 days. To keep longer, first 2 days, after draining, leave Paneer in a dry container in refrigerator. Starting 3rd day, add fresh filtered water in container to submerge Paneer in water. Just like you get fresh Feta from store. Paneer will not absorb water and will stay fresh longer submerged in water. (keep it refrigerated until ready to use.)
HOW TO MAKE FIRM PANEER?
Fresh Paneer before removing water is clouds of soft cheese curds. Once water is squeezed out and paneer is pressed under weight, soft curds glue together to make a block of Paneer.
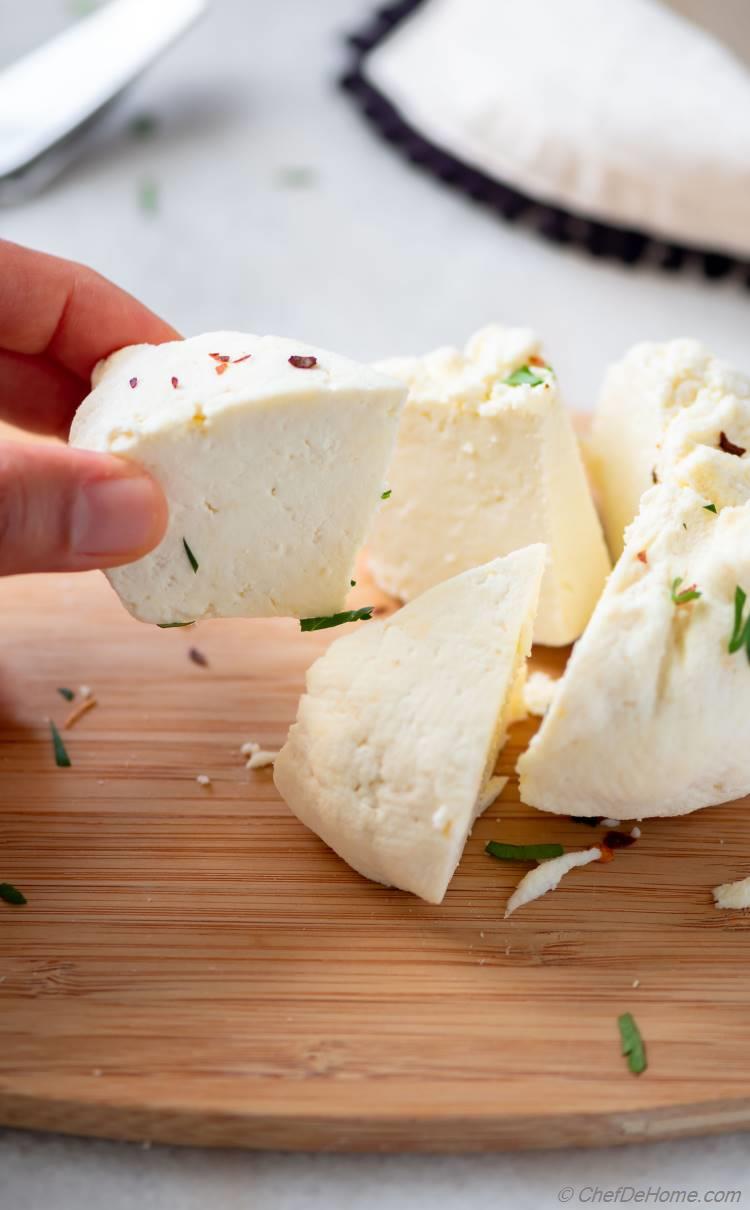
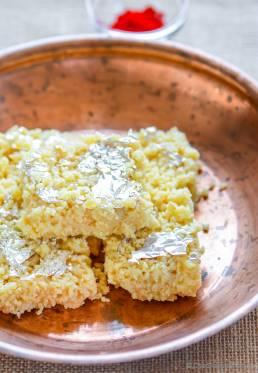
Paneer disk shown in pictures, I made it in the morning and waited 4 hours before slicing. As you can see, I was able to slice the paneer nicely. At this point, it tasted very fresh and almost melted in mouth. To make curry, I would refrigerate it overnight. So that it does not crumble in curry, and retain shape, texture.

Let me summarize this for you:
- Fresh Paneer - Drain curd from whey. Squeeze excess water. Set aside on a sieve and press gently under weight for 4 hours. Give curd a good squeeze to remove as much water as possible before making the knot of cloth. If curds are hot, let sit for few minutes before attempting to squeeze water. It is important to make Paneer curds make good bond and hold well together.
- Firm Paneer - To make firm block of paneer, take fresh paneer (made in Step 1.). Put it in a container with lid. Refrigerate for 4 additional hours up-to overnight. Next day, slice and use as recipe suggests.
Tip: Don't worry if day old Paneer looks dry or hard. It is natural Cheese. It can't be soft like culture-based cheeses. However, it will be soft just like store-bought Paneer when cooked in curry.
Make Paneer In Instant Pot?
Since Instant Pot is hot-favorite of everyone. I decided to also make Paneer in Instant Pot and share my experience (notes):
- Add 1/2 cup water in IP Pot followed by milk, lemon juice, vinegar (quantity as listed in Recipe Card). Don't mix.
- Place lid of pot. Set to Pressure cook on High for 1 minute. Switch Off. Let pressure natural release.
- Open the IP lid. To strain and make Paneer follow remaining steps of Recipe Card - starting from Step 4.
Tip: If you don't want to Pressure Cook, you can also heat IP on Saute setting and make paneer just like cooking on the Stove Top. All steps same as Recipe card except heat milk in IP pot instead of regular pot on the stove top.
Friends, I hope you enjoyed and had fun while making Paneer following my recipe and notes. In these tough times, keep yourself engaged, busy and connect with family and friends. Stay safe, stay healthy.
-Savita x
Make Paneer and then try these Paneer Recipes:
Homemade Paneer
(1 review)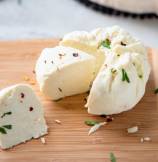
Ingredients
Directions
- 1. Prep Paneer Ingredients: Juice lemon and discard seeds. In a small bowl, add water, lemon juice and vinegar. Mix and set aside.
- 2. Heat Milk: Add cold milk to a deep pot and set to heat on medium-high heat until it starts bubbling near the rim of pot. (about 10 minutes) Don't let milk boil.
- 3. Coagulate Milk: Add lemon-vinegar mixture mixed in the first step into the milk. Stir and let it continue simmer until milk coagulates. (whey separate from curds) Continue simmering for 3-4 minutes or until whey is clear, watery and has no sign of white milk. Switch off heat. Let it sit for 5 more minutes.
- 4. Drain Paneer Curds : Drain curd through sieve lined with cheese cloth. Pickup cloth from all sides and twist to make a knot like making a parcel. Squeeze as much water as possible from cheese before making the knot. Put weight on top of cheese. Leave in the sieve to further drain for 3-4 hours. Additional Notes: Give curd a good squeeze to remove as much water as possible before making the knot of cloth. If curds are hot, let sit for few minutes before attempting to squeeze water.
- 5. Refrigerate Paneer: Once water has drained, open knot of cheese cloth. Remove disk of Paneer from the cloth. Paneer will be semi-solid block like block of feta cheese at this point. To eat fresh Paneer, slice and serve sprinkled with salt, and black pepper. To make curries, refrigerate overnight. Slice or dice before adding to the curry. Enjoy! Additional Notes: Check notes for how to refrigerate Paneer so that it keep fresh longer.
Savita's Notes:
- The good ingredients are essential for any recipe. Likewise quality of milk is very important to make good quality Paneer. For best results, please only use Whole Milk, unseasoned White Vinegar and fresh lemon juice.
- Always mix coagulating agent i.e. Lemon Juice, Vinegar with water before adding to the milk. This easy step helps to use less coagulating agent. If not diluted with water, you will have to use a lots of lemon/vinegar and/or milk will take longer to coagulate.
- Do you need both, lemon and vinegar to make Paneer?
I use both lemon and vinegar to make paneer. Lemon juice helps make soft curds which yield buttery delicious paneer. Vinegar helps in quick coagulation. You can still make paneer with just lemon juice or just vinegar. But please note, add extra lemon juice if milk don't coagulate with 2 tbsp of juice. - Seasoned Paneer for Snacking: Paneer is perfect for a high-protein unprocessed snack. To make seasoned Paneer, mix 1/4 tsp of salt and one of the following at start of Step 4.
a. 1 tsp minced garlic
b. 1 tsp chives, chopped and 1/4 tsp black pepper.
c. 1/4 tsp crushed red pepper, 1/4 tsp toasted sesame seeds, and chopped cilantro. - Don't rush to strain the coagulated milk. Let it come together. As you can see in the picture above, whey is completely separated from curds and curds have come together like little clouds. There is no sign of white milk.
- Time to Make Firm Block of Paneer: Fresh Paneer before removing water is like soft cheese curd clouds. Once water is squeezed out and paneer is pressed under weight, soft curds glue together to make a block of paneer. Paneer block shown in pictures, I had made in morning and waited 4 hours. As you can see, I was able to slice the Paneer without crumbing. At this point, it tasted very fresh and almost melted in mouth. To make curry, I would refrigerate it overnight. So that it does not crumble in curry, and retain shape, texture.
© Chef De Home. Post content including video and photos are copyright protected.
We Think You'll Love

Blogger behind Chef De Home. (...about me)


Leave a Message:
Did you try the recipe? Do you have feedback or a question? Leave a message below.
4 Responses
Nuru Joseph
My new favourite.I make a spinach and paneer curry, which requires me to lightly fry the masala paneer blocks before adding to the curry. It seems to melt a bit..the recipe shows store bought paneer,which seems to stay solid. What could I be doing wrong. The dish is still amazing, even with my slightly melted paneer. Many thanks.Savita
I find that using full fat dairy A2 milk make firmer paneer. You can also invest in paneer mould that helps draw most moisture out. Additionally, leave paneer in fridge for a day before using. I hope it helps. Thanks for sharing your feedback.Erin
Hi! Thank you for this very simple to understand recipe! I can’t wait to try it myself. I recently found out about paneer during a trip to Costco. When I tried it for the first time I was rather perplexed because it was like no cheese Ive ever had. I am on a Carnivore diet and was happy to find this cheese. Its very versatile. I do wonder if it is possible to add salt to the process, instead of just after the cheese is complete. Please share your thoughts? ThanK you again!!Savita
Hi Erin, I’m happy to share the recipe. I have never used salted milk to make paneer. I prefer to use it plain unsalted. Let me know how it goes if you try it with salt.