
Vegan Kimchi
An easy recipe for homemade vegan Kimchi made without fish sauce. This kimchi recipe is medium spicy and gets delicious flavor once fermented. Just like your favorite store-bought vegan kimchi!

Learn to make Vegan Kimchi at home with this easy recipe. I'm sharing tried and tested Vegan Kimchi recipe made with homemade kimchi paste without fish sauce using all vegetarian ingredients. This recipe is also gluten free, fat free, and preservatives free.
I love to keep a jar of Vegan Kimchi in refrigerator. Once fermented, kimchi develops delicious tangy-pungent flavor. It tastes just like real kimchi. You will not believe it is fully vegan.
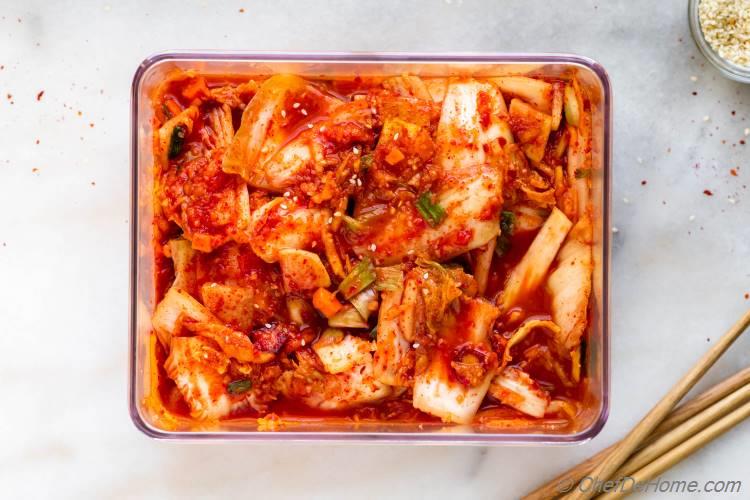
The above picture shows Kimchi fermented for 2 days in refrigerator.
What Do You Need to Make Vegan Kimchi?
For homemade Kimchi you will need two special Korean ingredients i.e. Gochugaru - Korean Chili Flakes and Sweet Rice Flour.
Gochugaru is Korean Chili Flakes that are bright roasted chili flakes with distinct fruity flavor. Gochugaru is mild to medium spicy and vegan.
Sweet Rice Flour is fine rice flour. You can get this in most Asian stores or buy online. For kimchi, sweet rice flour act as Kimchi Paste thickener. It is the key ingredient to make a consistent Kimchi Paste that sticks to cabbage. In my opinion, it is a must ingredient to make authentic Kimchi.
Here is a complete list of ingredients to make Vegan Kimchi:
- Napa Cabbage
- Sweet Rice Flour
- Gochugaru
- Chili Flakes
- Soy sauce
- Ginger
- Garlic
- Onion
- Carrots
- Radish - optional
- Green Onion
- Salt and Sugar

Salt Cure Napa Cabbage
To make Vegan Kimchi, I start by treating the Napa Cabbage with salt i.e. Salt Cure Cabbage. Salt draws out moisture from the cabbage. This process helps cabbage ferment properly and Kimchi stays fresh longer.
Make Vegan Kimchi Paste
As cabbage sits in salt, I make Kimchi Paste. Kimchi Paste is mixture of rice flour paste, Korean chili flakes, and grated ginger, garlic and onion. I also add white onion, carrots, scallion and white radish in Vegan Kimchi. These vegetables are completely optional. You can make Kimchi Paste just with rice paste, chili flakes, garlic and onion.
Fermenting Vegan Kimchi
To enjoy Kimchi within 24 hours of assembly, let Kimchi ferment at room temperature. Do not refrigerate. Please note that when not refrigerated, Kimchi will ferment quickly. Consume it faster.
To keep longer, refrigerate Kimchi after assembly. Let it ferment slowly. You can also keep a small jar of kimchi at room temperature to ferment quickly. Refrigerate remaining to use as needed.
How To Use Vegan Kimchi?
Honestly, I love Kimchi as a pickle/condiment with almost every meal. Specially a bowl of rice, grilled meat, and soups are best ways to use.
My Kimchi Cauliflower Fried Rice and Kimchi Fried Rice recipes are my other two favorite ways to eat more Kimchi.
Friends, the fermented Kimchi is healthy for gut and digestive health. It is loaded with probiotics. Plus it is a tasty condiment to serve with rice and grilled meat. On your next grocery trip, buy napa cabbage, rice flour and Gochugaru to try homemade Vegan Kimchi! Happy Kimchi eating. ;)
More Korean Recipes To Try:
Vegan Kimchi

Ingredients
Vegan KimchiDirections
- 1. Prepare Cabbage for Kimchi: Slit each Napa cabbage in half lengthwise and then cut each half lengthwise into two. Cut each quadrant into 3-4 pieces. Soak in cold water or run through cold running water until all cabbage leaves are thoroughly wet.
- 2. Salt Cabbage: Transfer few leaves of cabbage (soaked and drained) in a large mixing bowl (use bowl that can hold all of the cut cabbage or use two bowls). Sprinkle a teaspoon salt on the leaves. Scatter one more single layer of leaves on the top of salted leaves. Sprinkle a teaspoon of salt on top again. Repeat this process until all cabbage is salted. Set aside for 2 hours.
- 3. Stir Cabbage: Every 30 minutes, toss the cabbage leaves up side down. This helps leaves get even salt treatment. By 2 hours, cabbage will shrink very slightly and loose water that will collect at the bottom of bowl.
- 4. Make Rice Paste: In a small bowl, mix sweet rice flour with sugar until well combined. In a small sauce pan, add water with flour-sugar mix. Stir well. Bring to boil on medium heat, stir often with whisk to avoid lumps. Cook for 3-4 minutes or until paste is bubbling and shining. Stir often so that rice don't catch at the bottom. Set aside to cool completely.
- 5. Make Kimchi Paste: Use food processor (or grater) to small mince garlic, ginger and onion. Add to a large mixing bowl. Mix in gochugaru chili flakes, soy sauce, chili flakes, and cooled rice flour paste made in the step above. Add thin sliced carrot, radish, and scallions. Mix well. Set aside.
- 6. Rinse Cabbage: Discard water collected at the bottom of bowl with kimchi. Rinse salted cabbage thoroughly under running cold tap water. Shake off excess water.
- 7. Mix Cabbage with Kimchi Paste: Add cabbage to the kimchi paste mixed in Step 5. Using *hands gently coat all leaves in the kimchi paste thoroughly. Additional Notes: *Always wear gloves when handling chili peppers.
- 8. Ferment Kimchi: Transfer kimchi to a container with air tight lid. Refrigerate until ready to use. Kimchi starts to ferment in 24 hours. Mix Kimchi once every day to ensure good distribution of the flavor as it ferments. Use as desired.
Savita's Notes:
- To enjoy Kimchi within 24 hours of assembly, let Kimchi ferment at room temperature. Do not refrigerate. Please note that when not refrigerated, Kimchi will ferment very quickly. Consume it faster.
- To keep Kimchi longer, refrigerate Kimchi after assembly. Let it ferment slowly.
- Kimchi flavor is the best after a week fermentation in refrigerator.
© Chef De Home. Post content including video and photos are copyright protected.
We Think You'll Love


Blogger behind Chef De Home. (...about me)


Leave a Message:
Did you try the recipe? Do you have feedback or a question? Leave a message below.